Sunday, September 30, 2012

Happy Birthday Shelby - Chicken, Broccoli and Stir-Fry

This post is dedicated to Shelby at The Life & Loves of Grumpy's Honeybunch
I have been following Shelby's blog for the last two years.  I enjoy reading about Shelby's family and the wonderful recipes she shares.  

In honor of her Birthday I made Chicken, Broccoli, and Noodle Stir-fry.
Raising a glass to you Shelby and wishing you a very 
HAPPY BIRTHDAY, CHEERS!


Chicken, Broccoli, and Noodle Stir-fry


adapted from Food Network


1 lb chicken tenders, cut into bite sized pieces
2 cloves fresh garlic, minced and divided
2 teaspoons fresh ginger, grated and divided
1 tablespoon maggi sauce (or soy sauce)
1 tablespoon Splenda Brown Sugar
1 tablespoon plus 1 teaspoon cornstarch
1 tablespoon Mirin
1 tablespoon dark sesame oil
1/3 cup water
1 tablespoon vegetable oil
3 cups broccoli flowerets
1/2 teaspoon red chili flakes
1 tablespoon hoisin sauce
2 cups pasta, cooked according to package directions (I used lower carb pasta)

Mix 1/2 of the garlic and ginger with the Maggi sauce, Splenda Brown Sugar, Mirin, Sesame Oil, and 1 teaspoon cornstarch.  Place chicken pieces in sauce and toss to coat.  Marinate for at least 15 minutes.  Mix remaining cornstarch with 1/3 cup of water and set aside.

Heat large, non-stick skillet over high heat.  Add 1 tablespoon olive oil and heat oil, add broccoli and stir fry 1-2 minutes.  Add remaining ginger and garlic and chili flakes and two tablespoons of water; stir-fry another 30 seconds or so.  Transfer broccoli mixture to a plate and set aside.

Re-heat skillet and add another tablespoon of olive oil.  When oil is hot, add chicken mixture and stir fry until chicken is no longer pink.  Add hoisin sauce and broccoli, toss to coat.  Add remaining cornstarch mixture and stir until sauce thickens.  Add hot noodles and toss to coat.  Serve hot, sprinkle with more hot pepper flakes if desired.

Stop by Shelby's Blog and wish her a Happy Birthday


Until Next Time,
Pam

Wednesday, September 26, 2012

My Favorite Pasta - Rossi Pasta & a Giveaway

I love when bloggers share their favorite items. It nice to get their opinion before you purchase an item or maybe you didn't even know that it existed. 

 I wanted to share one of my favorite Pasta's that I have been buying for years.  Rossi Pasta is a gourmet pasta that is handcrafted and comes in array of flavors that cooks up fast and adds a ton of flavor to your recipes.

Besides the wonderful pastas, sauces, bread mixes and gift baskets you will find recipes on their website to go with the pasta you purchased.  

I made the Chicken Tequila Fettuccini to go with the Spinach Basil Garlic Fettuccini I had on hand.


Chicken Tequila Fettuccini
recipe from Rossi Pasta


1 package of Rossi Pasta Spinach Basil Garlic Fettuccini
1/3 cup fresh cilantro, chopped
2 tablespoons garlic, minced
2 tablespoons jalapeno peppers, minced
3 tablespoons butter
1/2 cup chicken stock
3 tablespoons tequila
2 tablespoons fresh lime juice
zest from one lime
3 tablespoons soy sauce
1 ¼ pound skinless, boneless chicken breast halves, cubed
1/4 red onion, sliced
1 red bell pepper, thinly sliced
1/2 yellow bell pepper, thinly sliced
1/2 green bell pepper, thinly sliced
1 ½ cups heavy whipping cream

1. Sauté the cilantro, garlic, and jalapeno pepper in 2 tablespoons of butter over medium heat for 4 to 5 minutes. Add the stock, tequila, and lime juice.
2. Bring the mixture to a boil and cook until reduced to a pate-like consistency. Set aside.
3. Pour soy sauce over the chicken and set aside for 15 minutes. Saute the onion and the red, green, and yellow bell peppers with the remaining tablespoon of butter, stirring occasionally.
4. Meanwhile, cook fettuccini according to package directions.
5.When the peppers have wilted slightly, add the chicken and soy sauce. Toss and add the reserved tequila/lime mixture and cream. Bring to a boil.
6. Gently simmer until chicken is cooked and sauce is thick. Toss with well-drained fettuccini and garnish with cilantro and lime zest.
Serves 4

What you can win - Rossi Pasta Deluxe Pastas & Sauce Basket


What's inside:
• Spinach Basil Garlic Fettuccini • Tomato Basil Garlic Fettuccini • Lemon Pepper Fettuccini • Capelli d'Angelo (Angel Hair) • Vino Rosso Linguini • Artichoke Linguini • Roasted Red Bell Pepper • Italian Spice Linguini • Classic Fettuccini • Classic Marinara Sauce • Sun-dried Tomato Sauce • Artichoke Sauce • Vodka Sauce

Entering is simple just leave me a comment telling me which of the Rossi Pasta's you would like to try. 

Giveaway is open to US residents. Giveaway starts September 26th and ends October 11th, 2012. One entry per person. Winner will be picked via random.org on October 12th and have 48 hours to respond otherwise a alternate winner will be picked.

Until Next Time,
Pam


Tuesday, September 25, 2012

Spicy Lime Ranch Dressing

Thank goodness this post is NOT about making french fries I will leave that to Ree at The Pioneer Woman.  Lets just say I have no business working with hot oil.

Open question to Ree:  How the heck do you cook with those beautiful silk tops without wearing that oil?  I have some hand washing to do before they go into the washing machine.

What this post is about is the dipping sauce I made for the french fries, a Spicy Lime Ranch Dressing. Fast, simple and you just might have all the ingredients on hand.  Next time I make a taco salad or southwest potato skins I'm making this dressing.

Spicy Lime Ranch Dressing


3/4 cup Litehouse Ranch Dressing
1 tablespoon Tapatio sauce
zest from one lime
juice from half a lime
1 tablespoon chopped fresh cilantro

Mix all ingredients together until blended. Refrigerate for 2 hours before serving.

Until Next Time,
Pam


Monday, September 24, 2012

Day Trip to the Desert


Bill and I went for a drive yesterday to the desert.  Got some nice photos of some old mines.  Also took a couple of interesting photos while we were going through one of the towns nearby the mine.

This closed hotel had beautiful stain glass windows above the windows and doors

Not sure what this ad was for. I love the colors and the way the paint is pealing off the bricks

 I think this could have been the office for this mine

Look at the way it was put together just using stones found in this area

This is what is left of the roof

There are mine shafts all over the property some are boarded up some are not

Here is a boiler and in the background is a mine shaft

There were core sample left all over the ground

 Couple of crows that were dive bombing each other

There was a ton of stuff buried in the ground

 Interesting shapes

This looks like part of a cast iron stove

Until Next Time,
Pam

Sunday, September 23, 2012

Pumpkin Spice Coffee

Are you all enjoying this beautiful Fall weather?  I just love the crisp mornings sitting outside wrapped in a blanket having my coffee while the sun comes over the mountain.  I see so much wildlife in the morning not sure if they see me or that they just don't care. Rabbits, squirrels, chipmunks and deer right off my deck it's worth getting up early.

Whether you are enjoying your morning outside or heading out to a tailgating party or maybe a hay ride. (do they still do hayrides?)  Fill those thermos up with Pumpkin Spice Coffee, it will warm your bones and save you money by not going to the local coffee shop.  


Pumpkin Spice Coffee

1 14oz can sweetened condensed milk
1/8 teaspoon fresh ground nutmeg
1 teaspoon pumpkin pie spice
pinch ground cardamon
pinch of kosher salt
1 pot hot coffee 

In a saucepan add sweetened condensed milk, nutmeg, pumpkin pie spice, cardamon and salt heat over medium-low flame stirring for 8 to 10 minutes.  Add coffee and stir together then serve.  

To make this coffee extra special add a splash of spiced rum and a dollop of homemade whipped cream and a cinnamon stick.  For a bit of heat add a pinch of cayenne pepper.

Until Next Time,
Pam


Jam Hands

Saturday, September 22, 2012

Welcome Fall

Happy First Day of Fall from Southern Utah

Photos were taken 3 miles above my house


Everyone must take time to sit and watch the leaves turn ~Elizabeth Lawrence
 Autumn is a second spring when every leaf is a flower ~Albert Camus

Winter is an etching, spring a watercolor, summer an oil painting and autumn a mosaic of them all ~Stanley Horowitz
A woodland in full color is awesome as a forest fire, in magnitude at least, but a single tree is like a dancing tongue of flame to warm the heart ~Hal Borland
Autumn, the year's last, loveliest smile ~William Cullen Bryant

Until Next Time,
Pam


Friday, September 21, 2012

Pecan Cider Acorn Squash

Wednesday I picked up my CSA basket and inside was a acorn squash.  With fall just a around the corner what could be more perfect than a acorn squash.  Going through my pantry I put together the ingredients below for the perfect "Fall" flavors.

Pecan Cider Acorn Squash


2 large acorn squash
2 tablespoons butter for each half of squash
2 tablespoons brown sugar for each half of squash
2 tablespoons cinnamon cider syrup or maple syrup add a couple shakes of ground cinnamon
1/2 teaspoon Worcestershire Sauce for each half of squash
2 tablespoons chopped toasted pecans for each half of squash
pinch of kosher salt for each half of squash

Pre-heat oven to 400 degrees.  With a large knife (and some muscle) cut the squash in half and scoop out seeds.  Score the squash both directions and add butter, brown sugar, syrup, worcestershire sauce, pecans and salt in the center of the squash. Place on baking dish or in a casserole dish with about 1/4 cup of water in the bottom (to prevent burning and to keep the squash moist).  Bake for 1 hour or more until completely cooked where a fork goes in and out easily.  Let sit for 10 minutes to allow the sugar to cool a bit.

Until Next Time,
Pam
Jam Hands


Thursday, September 20, 2012

Cowgirl Swank

I am in love with Cowgirl Swank I saw these darling custom made hats and visors and had to have one.  I shot them an email on ordering my hat and within a few hours I had a response back and after going over the details of what I wanted my order was placed and paid for.  In less than two weeks my hat arrived and I couldn't be more please with the quality workmanship.  The personal customer service is top notch which you don't find everyday.


Stop by Cowgirl Swank and check out their line you are going to love it!!!


Thank you Ladies I'm looking good over here at Living "Rancho Delux"

Until Next Time,
Pam

Canning Tools and Cowboy Candy


I am a beginner at canning and a year ago I bought all the tools needed to start my canning experience.
I started out slow making some bread and butter pickles and two different strawberry jelly.  It was enough to wet my whistle to expand my canning and to upgrade the tools of the trade.

At Williams-Sonoma I found the tools that I needed to make my job easier.

I love the Kilner- Stainless Steel Jam Pan it is large 8.45 qt and handle for easy carrying and a pouring lip.  However, one of the best features by far is the measurements in pints and liters printed on the inside of the pan and the encapsulated base for uniform heat distribution. Priced at $99.95 and pretty darn stylish too. 

Stock photo from www.kilnerjarsuk.co.uk

Next is from the company Progressive (which have wonderful kitchen tools).  I love the feel, design and looks of these tools.
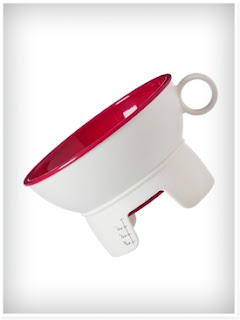
Canning Funnel - It fits standard and wide mouth jars, headspace measurements which I love and dishwasher safe. Priced at $7.95

Canning Lid Lifter - You can easily remove the magnetic lifter from your lids just by tilting the lifter to one side.  Priced at $2.95

Canning Tongs - Hands down a Winner!  The handle is spring loaded which makes it so easy to grab those jars easily out of the hot water.  Priced at $9.95 (stock photos from www.progressiveintl.com)

With the right tools canning is so much easier for the beginner and experienced canner. 


Cowboy Candy
Candied Jalapeños
by Rebecca found at Tasty Kitchen


3 lbs Fresh Jalapeños, washed
2 cups Cider Vinegar
6 cups sugar
1/2 teaspoon turmeric
1/2 teaspoon celery seed
3 teaspoons granulated garlic
1 teaspoon ground cayenne pepper

Remove the stems from the jalapeños and discard, slice the peppers 1/8 to 1/4 inch rounds and set aside. (note: use food grade gloves while handling peppers)

In a large pot bring cider vinegar, sugar, turmeric, celery seed, garlic and cayanne to a boil. Reduce to a simmer for 5 minutes. Add jalapeños and simmer for exactly 4 minutes. Use a slotted spoon to remove jalapeños add to sterile jars to within 1/4 inch of upper rim of jar. Turn the heat up on the syrup and boil   hard for 6 minutes.

Using a ladle pour syrup into jars over jalapeños, use a damp paper towel to remove any stickiness from the jar rim and place a 2 piece lid on and finger tightened.

Place into a boil water bath for 10 minutes for 1/2 pint jars and 15 minutes for pint jars.  Remove from boiling water and let sit 24 hours before tightening the jars completely.  Let sit for one month before serving or giving as gifts.


Leftover syrup can be canned also to be used in recipes, brushed over meats, etc.

Until Next Time,
Pam

Note: I was not paid or given items by Williams-Sonoma, Kilner and Progressive to review.  All items were purchased and used by myself

Thursday, September 13, 2012

Product Review - McCormick and LiteHouse

While I was at the market today in the spice section I noticed some "NEW" products and when I say new they are new to me.  I was looking to make a dip for the Bears vs Packers football game tonight.

I picked up a jar of McCormick Grill Mates Molasses Bacon Seasoning along with LiteHouse Freeze-Dried Red Onions, Chives and Jalapenos.  All these bold flavors are going to make a fantastic dip. 


After putting the dip together I did a taste test just to make sure I had all the flavors together just the way I wanted and these spices did not disappoint so much flavor.  Two hours later I taste tested again and WOW flavor town.  I highly recommend added these jars to your spice collection.


Sour Cream Bacon Dip

3 slices bacon, cooked and chopped fine
1 1/2 cups sour cream 
1 1/2 tablespoon bacon grease
1 1/2 tablespoon McCormick Grill Mates Molasses Bacon Seasoning
1 1/2 tablespoon LiteHouse Freeze-Dried Red Onion
1 1/2 tablespoon Freeze-Dried Chives
1 1/2 tablespoons Freeze-Dried Jalapenos Red
1/2 teaspoon red pepper flakes
salt and pepper, to taste

Cook bacon in a skillet until crispy, place on a paper towel to drain once cooled, chop fine.  Add bacon to sour cream along with bacon grease, McCormick Grill Mates Molasses Bacon Seasoning, LiteHouse Freeze-Dried Red Onions, Chives, Jalapenos, red pepper flakes, salt and pepper.  Mix well, cover and refrigerate for 2 or more hours. Serve with chips and veggies.

Until Next Time
Pam


Wednesday, September 12, 2012

Empty Nest & Comfort Food

As promised I'm back and will be posting on a more regular basis.  I have a bit more free time on my hands.  I'm sad to say that our home has become a "Empty Nest" my only child Anna has moved out.  Bill and I knew it was coming but that doesn't make it any easier and the fact that she moved out of state makes it even harder.

Bill and I are very lucky that we had and have a fantastic relationship with our daughter.  For 23 years we have watched her grow into a beautiful young woman and wish her nothing but the best for her new adventure.  We text everyday, talk every few days and once my new computer gets here we will be visiting via Face Time.

So what is a stay at home mom to do with more free time?  Cooking for one thing, my blog and working on my Etsy business HPLshop Hot Pink Lemonade.

It's been gloomy and rainy I think some comfort food is just the trick to get me out of the poor mom mood.  With the Holidays sneaking up on us fast I decided to try out a new stuffing recipe. I admire people who make their own stuffing, I'm not one of them.  I have used Mrs. Cubbison's stuffing mix for over 35 years and love it and don't plan to stop using it.  I might change which of the Mrs. Cubbison's I use or the ingredients I put in the stuffing but basically it is the same every time and my family loves it.


Mrs Cubbison's Smoked Bacon Stuffing

1 3 to 3 1/2 lb whole chicken, rinsed and dried
1 box Mrs Cubbison's Classic Dressing - Seasoned
1 cup diced celery, including leaves
1 cup diced onion
2 8oz cans sliced water chestnuts
12 medium to large mushrooms, cleaned and sliced (I like using crimini)
8 slices a good smoked bacon (I use Nueskes) cut into bite size pieces
4 large fresh sage leaves, julienned and rough chopped
1/2 teaspoon red pepper flakes
1 cup butter, melted
1 1/2 cups chicken stock

In a large bowl add both bags of stuffing, celery, onions and water chestnuts.

Cut sliced bacon into bite sized pieces (helpful hint: freeze bacon for 20 minutes to make cutting easier). Cook bacon until done but not crispy. Remove to a paper towel to drain. Reserve 2 tablespoons of bacon grease.  Add mushrooms to bacon grease and cook for 2 minutes (if too dry add 1 teaspoon of olive oil) add sage and red pepper flakes and cook an additional two minutes. 

Add bacon and mushrooms to stuffing mixture. Add butter and chicken stock and mix all ingredients together.  Remove enough of the stuffing mixture to stuff your chicken.  Place the remaining stuffing in a casserole dish.

Stuff chicken with the mixture and place chicken in roasting pan.  Rub chicken with the reserved bacon grease and sprinkle with salt and pepper.  Place in a pre-heated 325 degree oven for 2 to 2 1/2 hours or until chicken reaches a internal 180 degrees.  Place casserole dish of stuffing in the oven the last 45 minutes of the chicken cooking.

This stuffing will be on my Thanksgiving menu.

Until Next Time,
Pam


Tuesday, September 11, 2012

I'm Still Around

I have not fallen off the face of the earth.  I have a new blog post with a recipe coming up tomorrow.  I wanted to let you know what has been going on.

Life has been a bit crazy.  Both my husband and I have been in the ER.  Hubby got stung and had a very scary allergic reaction and my BP got out of control.  Of course both of us ended up in the ER on a Sunday.  We are both recovered and doing fine. 

From my posts a year ago we were  having well pump problems and they are back.  Don't know what the heck is going on but our pump we replaced a year ago seized up and had to be replaced.  We were out of water for a week.  We are still having problems with the pressure and filling our tanks.  Bert thinks it is some nasty spongy enzyme attacking our pump and he is working on it.  Keeping our fingers crossed for a good out come this week.  For now we are only turning the pump on when we need water.

Until Next Time,
Pam


Blogging tips