Friday, January 17, 2014

Frank's Red Hot Sauce Chicken Roll Ups

Round two of getting my football grub on.  Going with the finger foods that I can prepare early and enjoy the game with everyone else.  I love the flavor of chicken wings, but not a fan of the chicken wings.  I decided to make them into tortilla roll ups using a rotisserie chicken and when I saw the Frank's Red Hot BBQ Sauce I new I had to do some roll ups with that sauce.  Here is what I came up with.


Frank's Red Hot Sauce Chicken Roll Ups

1 pre-cooked rotisserie chicken, shredded and divided
1 8oz package cream cheese, room temperature, divided

Buffalo Chicken Roll Ups

1/2 cup Franks Red Hot Wing Sauce
4oz cream cheese (from above)
2 tablespoons blue cheese dressing
crumbled blue cheese
1 carrot, julienne cut
1 celery, julienne cut
red leaf lettuce
2 tortillas (I used one flour and one spinach)


BBQ Chicken Roll Ups

1/2 cup Franks Red Hot BBQ Sauce
4oz cream cheese (from above)
2 tablespoons Franks Red Hot BBQ Sauce
2 bacon, cooked and crumbled
1/2 small onion, sliced thin
1 tomato, seeded and diced
red leaf lettuce
2 tortillas (I used one flour and one sun dried tomato)

Shred chicken and divide into two bowls.  Add buffalo sauce to one and bbq sauce to the other bowl, set aside.

Mix together the cream cheese and blue cheese dressing in a small bowl.  Mix together the cream cheese and Frank's BBQ sauce in another bowl.

Buffalo Chicken - Assemble roll ups - Spread cream cheese mixture on tortilla's, sprinkle with blue cheese, alternating carrots and celery on top of tortilla, top with buffalo sauce chicken then lettuce.  Roll up tight with wax paper and place in refrigerator.

BBQ Chicken - Assemble roll ups - Spread cream cheese mixture on tortilla's, arrange bacon, tomatoes and onions on top of tortilla top with bbq sauce chicken then lettuce. Roll up tight with wax paper and place in refrigerator.

Refrigerate for at least one hour.  Cut the rolled tortillas into 3/4 inch slices.

Shared with Weekend Pot-Luck #101

Wednesday, January 15, 2014

Baking and Cooking Groups - January

I am currently in 4 baking and cooking groups. (one of the groups does not start until February).  Instead of doing a blog post for each of the groups I decided to go with one blog post.  This way I am showing what I have been up to for the last month and 3 of those groups I will not be posting recipes.  The reason for not posting the recipes: Their cookbooks just came out and I don't have permission from the publisher to post the recipes.  This way if you like what you see you can purchase the cookbook without going into it blind.


The first recipe comes from Baking Partners: Group of Home Bakers We had our choice of baking a Traditional Dutch Apple Pie or Kofieebroodje (Dutch Coffee Buns).  I chose the Traditional Dutch Apple Pie.  This pie might look like a lot of work however, it is a very easy pie to make.


Traditional Dutch Apple Pie

Crust:
300 grams all-purpose flour
1 tablespoon baking powder
1/2 teaspoon salt
200 grams butter (cold)
150 grams packed brown sugar
1 large egg
zest from one lemon

Pre-heat oven to 375 degrees

To make the crust, in a bowl sift flour, baking powder and salt.  Add cold butter cut into chunks, using hands rub butter into flour until a crumbly dough has formed. Add brown sugar, egg and lemon zest.  Knead dough until everything is incorporated and forms a ball.  Wrap dough in plastic wrap and place in refrigerator for at least a 1/2 hour.

Filling:

6 granny smith apples
1/2 lemon juice
1 cup golden raisins
1/4 cup rum (or apple cider)
75 grams brown sugar
1 tablespoon Speculass Spices *
2 tablespoons plain dried bread crumbs
1/4 cup apricot jam

Soak raisins in rum or cider while you prepare apple.  Peel and core apples and cut into chunks. Drizzle with lemon juice making sure all apple chunks are covered.  Drain raisins add to apples.  (do not discard rum/cider)  Add brown sugar, speculass spices to apples mix until coated.

Remove dough from refrigerator and cut 1/5th of the dough and set aside.  With the remaining dough press into and up sides of a 9" springform pan. Sprinkle bread crumbs in the bottom of the springform pan on top of the dough.  Add apples and raisins.  Take the dough you set to the side and roll into strips to make a lattice top.  Bake at 375 degrees for 20 minutes.  Lower oven temperature to 350 degrees and bake another 40 to 45 minutes.  10 minutes before pie is done in a small saucepan add apricot jam and reserved rum heat until melted.  After the pie is taken out of the oven brush the top with the apricot mixture.  Allow to cool 10 minutes before removing springform.  Cool to room temperature before slicing.

* Speculass Spice

4 teaspoons ground cinnamon
1 teaspoon ground cloves
1 teaspoon ground mace
1/3 teaspoon ground ginger
1/5 teaspoon white pepper
1/5 teaspoon ground cardamon
1/5 teaspoon coriander
1/5 teaspoon anise seeds
1/5 teaspoon freshly grated nutmeg

Next from Baking through Lick The Bowl Good we made the Banana Pecan Breakfast Cake, on page 151 of Monica Holland's cookbook Lick The Bowl Good: Classic Home-Style Desserts with a Twist which can be found on Amazon by clicking the link.   The coffee cake was moist and delicious and a nice change from the standard coffee cake and what a great way to use up the ripe bananas.


Last but not least from Cooking from The New Midwestern Table by Food Network Star Amy Thielen on page 85, Best-Ever Beer Cheese Soup.  Serve this soup with a loaf of crusty bread and a beer and you are set for chilly night.  I love that you use a sharp white cheddar cheese which is one of my favorites.  You can purchase Amy's book The New Midwestern Table: 200 Heartland Recipes from Amazon.

If you would like to join any of these baking/cooking groups the links are above.  For February we are adding another baking group which is Baking through Wintersweet feel free to check us out.

Monday, January 13, 2014

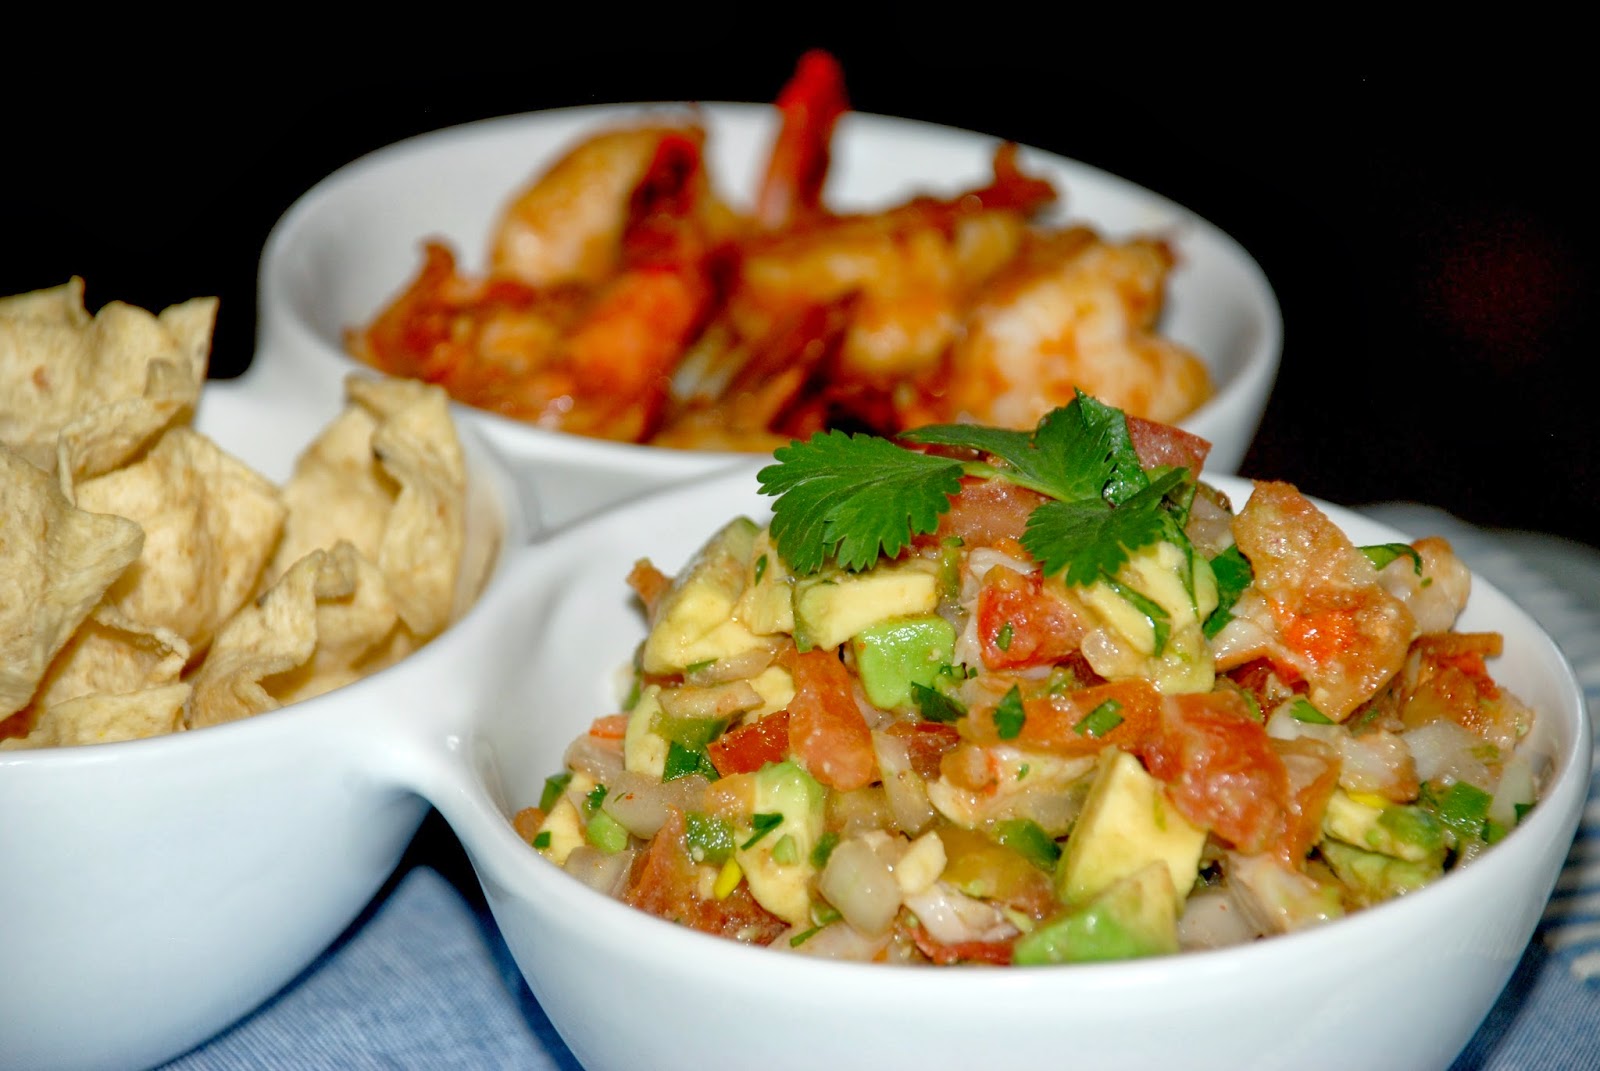
Shrimp Salsa


Round one of football grub. Are you ready for a twist on your salsa? Add some chopped shrimp that has been sautéed with south of the boarder seasoning and a splash of tequila.  Your guests will 
    be shouting ole'.


Shrimp Salsa

1 to 2 lbs fresh shrimp, depending on how many shrimp you want to serve on the side
1/2 teaspoon chili powder
1/2 teaspoon cumin
1/2 teaspoon chipolte powder
1/2 teaspoon kosher salt
2 tablespoons olive oil
1/8 cup tequila (optional)
5 tomatoes, (I used roma)
1 small onion, minced
1 jalapeño, minced
1/2 cup cilantro, rough chop
1 avocado, diced
1 clove garlic, minced
1 lime, zest and juice
Salt to taste

Shell, devein, rinse and pat dry shrimp (it is up to you if you want to leave the tails on).  Mix together the chili powder, cumin, chipolte powder and salt.  Sprinkle on shrimp both sides.  Heat a skillet on medium high add olive oil, when hot add shrimp and cook approx. 2 to 3 minutes on each side.  Remove from heat add tequila stir to coat each shrimp.  Move to a bowl making sure you get all the olive oil mixture in the bowl and allow shrimp to cool completely.

Remove shrimp from bowl leaving all the goodies in the bottom of the bowl.  Chop up enough shrimp to make 3/4 cup and put back into the bowl, add onion, jalapeño, cilantro, avocado, garlic and lime, mix together, salt to taste.

Serve with tortilla chips and leftover shrimp.


Wednesday, January 8, 2014

2014 Has Been Postponed

When it comes to the new year like most everyone else I look forward to a fresh start and new beginnings.  

That has not happened at our house......

They say things happen in 3's

1.  New Years Eve.....I came down with a nasty cold (and still have it)

2.  January 2nd....Water pump went out in the truck (just got it back yesterday morning and we only have one vehicle)

3.  Yesterday our poor fur baby Olive was running in the snow below our house and got caught up in barbed wire.  The best way to explain what happened to her it was like skinning a buck with her injury. We rushed her to the vet, she got 10 stitches, and the doctor said she had no muscle damage.  She is doing well this morning although you can tell she is uncomfortable.

Please excuse me while I get Olive and myself back to being healthy.  Then I can start making 2014 the new beginnings like it is suppose to be.


Wednesday, January 1, 2014

Happy New Year and Mexican Egg Bake

Happy New Year 


I was thinking back to 1999 and how the media was getting everyone in a frenzy thinking that it was the end of the world....or maybe just everything that was technical was going to fail.  That doesn't seem that long ago and fast forward here it is 2014.


Did you host a party or go to a party last night?  New Years Eve is one of those nights hubby and I stay home and enjoy each others company.  We watched TV and rang in the New Year with some Black-Eyed Peas and Cornbread.

This morning I made a Mexican Egg Bake something I could throw all together pop it in the oven and have it ready in time to watch the Rose Parade.  Today is an HGTV day my favorite part about New Years Day - Starting with the Rose Parade and Ending with the HGTV 2014 Dream Home.

Mexican Egg Bake

16 oz can refried beans
1/4 cup enchilada sauce
6 eggs
1/2 cup ricotta cheese
1/2 onion, chopped
1/4 cup cilantro, rough chop
1/4 cup sliced black olives
1/4 cup jarred sliced jalapeño peppers (or canned diced mild green chilies)
2/3 cup shredded cheddar/jack cheese mix
1/2 teaspoon salt
1/4 teaspoon black pepper

Preheat oven to 375 degrees. Spray an 8 x 8 baking dish with vegetable spray.  Add refried beans spread evenly in baking dish.  Drizzle the top of the beans with the enchilada sauce and set aside. In a medium bowl whisk together eggs and ricotta cheese.  Add onion, cilantro, olives, jalapeños, cheese, salt and pepper, stir well and pour over the refried beans.  Bake for 35 to 40 minutes or until eggs are set.  Serve with warm tortillas, salsa, sour cream, avocados or guacamole.


Tuesday, December 24, 2013

Merry Christmas

From my house to yours I wish you a very Merry Christmas and Happy New Year


Thursday, December 19, 2013

Gearing up for the New Year

I chose not to participate in a bunch of Christmas posts for a couple of reasons.  One everyone is doing it and doing a wonderful job I enjoy reading everyone's holiday posts and two my biggest reason I'm still having a hard time adjusting to an empty nest.  My Christmas shopping has been done for 2 weeks now and has been shipped out and received which has taken a huge load off my shoulders.

Now I'm taking comfort in listening to Christmas music and planning a holiday dinner for my husband and myself and reflecting on how thankful I am that everyone I love is happy and in good health.  It's been pretty hard down sizing the Thanksgiving and Christmas meals.  I am use to feeding armies of people.  When living in California we had all my husband's single friends over to share the holidays with us, my daughter's friends, we had an open door policy, I miss that.

Wow, I sound like a Debbie Downer and I didn't plan on that.  I'm sorry.  Time to change gears. (no offense to the Debbie's out there)

Between now and until the end of the year I am going to start planning out my short term and long term goals for 2014 and beyond.

Cooking Groups:

I am going to continue with the two Cooking Groups I'm in:

Baking Partners a group of home bakers working on expanding out of our comfort zone 

Cooking from The New Midwestern Table by Amy Thielen  Cooking through Food Network Star Amy Thielen's cookbook

A new Cooking Group that starts up in January:

Baking through Monica Holland's cookbook Lick The Bowl Good

Getting in touch with my creative side:

My husband and I are both going to be working on Art Journals.  I have bought each of us a bound sketch journal.  The plan is to use the two open pages to be creative, sketching, painting, doodling, or writing once a week through the whole year.

I plan to work on my writing skills in 2014.  I have two different writer's kit and will be setting aside time each day to do some writing.

I am going to read up on and take online classes in Photography.

I would like to start dabbling into home decorating - my 2014 project will be my bedroom

I am planning on officially opening my Ranch Delux Etsy Shop.  Which will have handmade and vintage gifts.

Enjoy these last few days leading up to Christmas

Sit down with a cup of tea and some of those holiday treats that friends gave to you or that you made yourself.  Watch a Christmas movie, listen to your favorite Christmas CD,  journal about blessings in your life and look forward to the new year and new beginnings.


Monday, December 16, 2013

French Onion Soup

Two weeks ago we got 14 inches of snow, since that day our temps have been getting warmer everyday.  I'm enjoying the 40 and 50 degree temps, however, the snow isn't melting as fast as I would like.  When you are in the sun it is very comfortable but get in the shade with all this snow around you, it's pretty darn chilly.

I went for a walk around our property which was very nice until I got to areas that the sun doesn't hit and I had snow up to my knees.  That's a sight to see me trying to get out of the snow especially when Olive is attacking me. (Olive is our 2 year old English Bull Terrier, who loves the snow)

After flopping around in the snow I was glad I had a big pot of French Onion Soup sitting on the stove top simmering.  The moment I opened the door the aroma put a smile on my face.  There is nothing like warming up with a bowl of steaming soup.


French Onion Soup

1 stick of butter
4 to 5 onions, sliced thin
1/2 tablespoon fresh rosemary, minced
3 to 4 fresh thyme sprigs
3 cloves garlic, minced
3 bay leaves
pinch red pepper flakes (because everything is good with red pepper flakes)
1 1/2 teaspoons kosher salt
1/2 teaspoon, fresh ground pepper
2 heaping tablespoons flour
1 cup red wine (I used Purple Cowboy, Tenacious Red, tastes good too)
1 32oz box beef stock (low sodium)
Gruyere Cheese, shredded
lightly toasted baguette bread, sliced about an inch

In a large stock pot melt butter, add onions, rosemary, thyme, garlic, bay leaves, red pepper flakes, salt and pepper.  Stir until everything has been coated by the butter.  Sauté on low for 45 minutes, stirring occasionally.  Sprinkle in flour and stir, cook down flour for 5 minutes, add wine, stir and reduce on low for 15 minutes.  Add beef stock, adjust salt and pepper to taste, cover and heat on medium low heat for 25 minutes.  Before serving remove bay leaves and thyme stems. Dish up soup in oven safe bowls, top with a slice of bread and a good amount of cheese.  Place under the broiler until cheese is melted and starts to brown.  Sprinkle with fresh thyme leaves.

Shared with Weekend Potluck #99

Sunday, December 15, 2013

Chef'n Banana Slicer

My favorite new kitchen gadget is the Chef'n Banana Slicer that I ordered from Williams-Sonoma $9.95 (I did get free shipping).  I know what your thinking just pull out a knife and slice it yourself.  But then I wouldn't get inform slices of banana.  The banana slices are perfect for cereal, banana cream pie and peanut butter banana sandwiches.  Makes a nice stocking stuffer or to threaten your husband.

Video from Chef'n


Then I find this very funny video about banana slicers.  I'm still standing behind my purchase.


Friday, December 13, 2013

Teriyaki Chicken and Vegetables

It is no secret that I make dinners around the vegetables I have in my refrigerator.  I very rarely put specific vegetable in a recipe.  It comes down to personal taste and what we have on hand.  I am lucky to have a family that loves vegetables so we have a little meat with our vegetables, when I make a stir-fry.  That is the beauty of a stir-fry you can put anything thing in this one dish meal.  Serve with a side of steamed rice and you are ready to go in minutes.


Teriyaki Chicken and Vegetables

3 chicken breasts, boneless skinless, cut into bite sized chunks
your favorite bottled teriyaki sauce
fresh ginger, approx. 2 inch knob peeled and sliced
1 teaspoon fresh ginger, grated
2 to 3 tablespoons sriracha
1 large garlic clove, minced
your favorite veggies, cut into bite size pieces
I used - carrots, celery, broccoli, onions, mushrooms, orange bell pepper, and snow peas 
8 oz can sliced water chestnuts
8 oz can sliced bamboo shoots
sesame seed oil
canola oil

Start by cutting chicken breasts into bite sized cubes and placing in a ziploc bag.  Pour enough of the teriyaki sauce  in to cover all the chicken along with the sliced ginger; refrigerate for at least two hours or over night.  In a small bowl or jar place 1 cup teriyaki sauce, sriracha, grated ginger and minced garlic; mix together well and refrigerate the same about of time as the chicken.

Cut vegetables into bite size pieces; if using carrots and celery cut thin on the diagonal, slice mushroom. (I used 2 carrots, 2 stalks of celery, half of a onion, 8 medium mushrooms, one medium orange bell pepper, cup of broccoli florets and a handful of uncut snow peas).  

Using a hot wok or large skillet add a small amount of sesame oil and canola oil (about 1/4 teaspoon of each) on high heat and cook the carrots, onions, broccoli, bell pepper and celery until just tender and remove to a plate, sauté the mushrooms; remove to plate, add chestnuts and bamboo shoots; cook until heated through; while cooking all the vegetables add additional oil if where needed. 

Add additional oil and cook chicken in small batches until it is done; which is about 6 minutes for each batch.  Add vegetables and the uncooked snow peas; pour teriyaki sriracha glaze over chicken and veggies; cook until heated through. Serve with steamed or fried rice.

Note:  If you would like the sauce to be a little thicker after the chicken is done cooking sprinkle with 1/2 teaspoon of cornstarch and stir for 4 minutes; then add the vegetables and glaze.


Shared at
Yesterfood

Wednesday, December 4, 2013

Cheese Appetizers Two Ways

Tis the season for parties.......whether it's for work, family, couples or girls night-in it's time to party.  I made two appetizers using two different cheeses and toppings.  These are perfect if you are bringing them to someone's party or at home since you can serve them at room temperature.  Crack open a couple bottles of wine - The brie pairs nicely with Pinot Grigio and the muenster pairs nicely with a Gewurztaminer.

If you are considering hosting a party think about an Appetizer Party and asking each guest to bring an appetizer.  So you don't end up with all chips and dip consider consider talking to your guests on what they are planning on bringing or maybe putting ideas on a slip of paper, placing them in a Christmas stocking and having them pull out a slip of paper.  You don't want to tell them what to bring put an idea, example: cheese plate, chips and dip, meat appetizer, cheese appetizer, flavored nuts, veggie dish, hot appetizer, cold appetizer.

As the host you can provide a couple of more elaborate appetizers and the drinks.


Cheese Appetizers Two Ways

3 baguette loaves
olive oil
1 1/2 teaspoon butter
salt
pepper
President Brie Log
Cranberry Relish (recipe below)
large onion
1/2 teaspoon fresh thyme, rough chopped
muenster cheese
fresh sage, minced
fresh cilantro, minced

Preheat oven to 375 degrees. Cut the baguette loaves 1/4 inch on the diagonal and place on cookie sheets, drizzle with olive oil and sprinkle with salt and pepper. Bake in over for 9 minutes.

Heat a medium skillet until hot on low, add 1 1/2 teaspoons of butter and olive oil.  Quarter the onion and then slice thin.  Add onion to skillet and sprinkle with salt and pepper, stir until all of the onion slices are covered in the butter and olive oil.  Stir occasionally allowing the onions to caramelize I like to cook them about 50 minutes or until they get a deep brown color. Last 10 minutes add the fresh thyme and stir.

Preheat oven to 400 degrees. Divide up the baguette slices into 3 piles.  First pile top with 1/4 sliced Brie and place on a cookie sheet, second pile top with 1/4 slices muenster cheese and place on a cookie sheet.  Place in oven just until cheese starts to melt.  Remove from oven.  Top brie with a teaspoon of cranberry relish and sprinkle with fresh cilantro.  Top muenster cheese with caramelized onions and sprinkle with fresh sage.  The third pile of baguette slices arrange on a plate and serve with the left over cranberry relish.  You can also do extra onions so guests can help themselves with the leftover bread and relish.

Cranberry Relish

2 bags of OceanSpray Fresh Whole Cranberries, picking out any squishy berries
1 1/2 fresh jalapeños, diced
2/3 cup cilantro
1 tablespoon fresh ginger, diced small
1/2 red onion, minced
zest from one large orange
juice from that orange
2/3 cup chopped toasted pecans
2/3 cup sugar or to taste

Using a food processor pulse cranberries doing a quarter of them at a time.  With the last batch of cranberries add the diced jalapeños, cilantro and ginger, pulse.  Add to the rest of the cranberries and stir.  Add orange zest, orange juice, stir.  Add sugar and red onion and mix together.  Allow the mixture to sit for 15 minutes stir again and taste to see if you want it sweeter.  (you want to make sure the sugar dissolves before tasting) add toasted pecans.   Put relish in a strainer over a bowl for 15 minutes that way the relish will not be real wet.

Shared with Hearth and Soul Blog Hop


Monday, November 25, 2013

The question that is baffling the culinary world

Observation and curiosity has prompted this post and asking this very serious question:

When is a Grilled Cheese Sandwich not a Grilled Cheese Sandwich?

This is the question and a serious question I might add.  I have seen bloggers post recipes for their so called "Grilled Cheese Sandwiches" and they have big chunks of chicken, turkey, ham, bacon...well you get where I'm going on this.  Putting meat, veggies on your grilled sandwich to me makes it a sandwich with cheese, not a Grilled Cheese Sandwich.

I have been giving this a lot of thought (I know I'm sure I have better things to do).  I guess you can call it a grilled cheese sandwich if the cheese ratio is greater than the other items you slap between two slices of bread.  Which brings me to another question, is it a sandwich when it is oozing with so much cheese that you are unable to pick it up to eat it but instead have to get out a fork and knife?

You might be asking yourself what prompted this question about a simple Grilled Cheese Sandwich instead of asking something like What's the meaning of Life....

Here it is - My lunch


Okay, let's break this down....the cheese ratio is greater than the prosciutto ratio since prosciutto is sliced paper thin, the tomato ratio is greater than both the cheese and prosciutto (4 slices of tomatoes) and no I did not burn the bread I happen to love to drizzle worcestershire sauce over my grilled sandwich or if I'm feeling sassy tabasco sauce. 

So what is this folks....a grilled cheese sandwich or just a sandwich with cheese on it.

You be the judge


Saturday, November 23, 2013

Time for a Facelift

Living Rancho Delux is getting a facelift and there will be some changes around the Ranch.  

My target date is January could be sooner or or could be later since I'm flying by the seat of my pants.  Right now I'm working it out on paper and looking for someone to help me with a new design and layout.

There will be limited posts until this is completed - I want to do this right.

Wish me luck

Tuesday, November 19, 2013

Christmas Place Setting

I bought some new dishes and glasses for Christmas and today I started playing with the place-settings seeing what I liked and what I need to add to make a perfect Christmas Place Setting.

I started with the Williams Sonoma Botanical Christmas dishes.  I knew right after purchasing them I had to have my friend Renee from Kudos Kitchen by Renee to hand paint wine glasses to match the William-Sonoma dishes.  The wine glasses are perfection I just love them and they make the place-setting.  My photos don't do the wine glasses justice.

I found the red dishes and glasses at a local antique shop I am going to go back and see what else they have I am very pleased on how well they go with the dishes.

The charger and napkins I purchased at Target and the flatware are my everyday flatware from Sundance Catalog.  Links for everything except the vintage dishes are below.


Williams-Sonoma Botanical Wreath Dinner Plates

Kudos Kitchen by Renee Hand-painted Wine Glasses

Sundance Catalog Artisan Hammered Flatware

Charger and Napkins bought in store at Target

Red Bowl and Glass Vintage

Now it's time to think about the little touches to take this place-setting to the top, candles, floral, napkin rings, etc...


Monday, November 4, 2013

Roasted Garlic Brown Butter Sage Mashed Potatoes

I made mashed potatoes this weekend they were not the prettiest mashed potatoes but they are so delicious.  My husband does not eat gravy, no way, no how, never, ever!  Who wants to serve plain old mashed potatoes.  I have added sun dried tomatoes, cheddar cheese, parmesan cheese, onions, shredded roasted brussel sprouts, toasted pine nuts, bacon, small diced smoked pork chops, pepperoni, just to name a few things.  I thought with the brown butter craze I really needed to try that and it did not disappoint. 


Roasted Garlic Brown Butter Sage Mashed Potatoes

3 pounds medium yellow potatoes
2 heads of garlic, roasted
1 stick of butter
1 1/2 tablespoons fresh sage, minced
1/2 cup heavy whipping cream

salt and pepper, to taste

Wash and cut in half potatoes place in a large dutch over covering with water an inch over the potatoes, salt water and cook until fork tender.  While the potatoes are cooking melt the butter in a small skillet, add sage and medium low heat, allow the butter to brown. Drain potatoes and mash before putting them in your stand kitchen mixer aka KitchenAid. Add cream, roasted garlic, salt and pepper, slowly add the brown butter until incorporated.


p.s.  Have you entered yet?  You know, to win your very own copy of Butter Baked Goods Cookbook.  You haven't! Click here to enter - Ends Soon 

Wednesday, October 30, 2013

Cookbook Review and Giveaway

Cookbook Review and Giveaway

Butter Baked Goods by Rosie Daykin
Nostalgic Recipes from a Little Neighborhood Bakery


If you love the cover of this cookbook you are going to love what is in this book.  Beautiful photographs, over 100 recipes, helpful hints and how-to's.  What I love about this cookbook recipes anyone can make and if you are my age (cough cough) it takes you back when grandma made those recipes.  These are recipes made with love.

I decided to open the cookbook and whatever was on that page that would be the first thing I would make out of Butter Baked Goods.

I opened to page 115 - Butterscotch Crispy Bars a nice spin on the Rice Crispy Treats.  Only 6 ingredients, simple to make and packed with flavor.  


I'm sorry that I'm not posting the recipe the cookbook just came out and I don't think that would be fair to the author

With recipes like:

Apple Bacon Cheddar Scones
Maple Snickerdoodle Sandwich Cookies
The Campfire Bar
Triple Lemon Layer Cake
Peanut Butter and Jelly Cupcakes
Butter's Famous Marshmallows (you heard right)
Chocolate Honeycomb Brittle

How could you go wrong with this cookbook! And if things couldn't get any better and they have I am giving away to one lucky person Butter Baked Goods Cookbook and this adorable set of measuring cups.


Going to be in British Columbia, Canada stop by and visit
Butter Baked Goods
4907 Mackenzie Street, Vancouver, BC

If you feel the need to share this giveaway with your friends - The "Karma Gods" shall smile down on you with good favor.


Monday, October 28, 2013

Lemon Poppy Seed Zucchini Bread

I am not a magazine hoard.  I go through magazines rip out articles I want to read, ideas for decorating and recipes.  I have folders that I put the articles in except for recipes I have a box.  My stack of magazine recipes is around 6 inches tall.  Last week I started going through the stack and picking out a few I would like to make.  If I like the recipe it will get a permanent spot if I don't care for it in the trash it goes.

This recipe I cut out of the Southern Living Magazine over a year ago in other words this is a pretty new recipe I have some that go back 8 years.  

I had all the ingredients on hand so this was the first recipe I made.  My husband is the type that if I would have said it is zucchini bread he would not have tried it.  I started out saying it was Lemon Poppy Seed Bread.  After he tried it and loved it I told him about the zucchini and he was very surprised.  Something new he will eat, Go Me!  Since I made the 3 little loaves he has eaten two of them.  I had more zucchini so I made another batch.   Being little loaves they would make nice gifts or wrap up and store in the freezer. 


Lemon Poppy-Seed Zucchini Bread
Southern Living Magazine, August 2012

1/2 cup softened butter
1 1/3 cups sugar
3 large eggs
1 1/2 cups flour
1/2 teaspoon salt
1/8 teaspoon baking soda
1/2 cup sour cream
1 cup shredded zucchini
1 tablespoon lemon zest
2 teaspoons poppy seeds

Preheat oven to 325 degrees; prepare 3 - 5x3 loaf pans with grease and flour; set aside.

Beat butter at medium speed with an electric mixer until creamy.  Gradually add sugar, beating until light and fluffy. Add eggs one at a time; just until blended between each addition.

Stir together, flour, salt and baking soda. Add to butter mixture alternately with sour cream.  Staring and ending with the flour.  Beat at low speed just until blended after each addition.  Stir in zucchini, lemon zest and poppy seeds.  Spoon into loaf pans evenly, about 1 1/3 cups per pan.

Bake for 40 to 45 minutes or until a wooden tooth pick comes out clean.  Cool pans completely on a wire rack (about 30 minutes).


Thursday, October 24, 2013

Italian Meat Sauce

A few days ago hubby said it's been a long time since I last made a meat sauce.  Boy was he right I can't even remember the last time I made it.  When you think of an Italian meat sauce you picture hours of slaving in the kitchen and I think a lot of people don't want to deal with it.  Yes, it does take hours to make a good meat sauce but 3 hours of it it's just sitting there simmering.  Every 1/2 hour or so you go in a give it a nice stir and bask in the beauty of what you are making.

What is nice about a meat sauce after you have spent the hours waiting for the sauce it only takes about 10 minutes to boil the pasta.  Or if you want everyone think you really slaved make a lasagna, stuffed shells, manicotti, this sauce is so versatile.  If you like a thick sauce just follow the recipe below if you like a thin sauce I have that in the recipe too.


Italian Meat Sauce

2 tablespoons olive oil
1 large onion, finely chopped
3 stocks celery, finely chopped
2 large carrots, finely chopped
3 cloves of garlic, minced
4 ounces pancetta, diced small
1 pound lean ground beef
1/2 cup dry red wine
3 tablespoons tomato paste
32 or 35 ounce can Italian peeled tomatoes whole
1 1/2 cup beef stock (maybe more)
2 teaspoons dried oregano
2 large bay leaves
1 teaspoons red pepper flakes (1/2 teaspoon for less heat)
1 cup milk
salt and pepper to taste
basil
parmesan cheese

Heat olive oil over a medium high heat in a large dutch oven.  Add onions, celery and carrots; sauté for 10 minutes; or until soft.  Add garlic and stir until you can smell the garlic.  Add pancetta; give it a few stirs and then add ground beef, at this point I like to add a little salt and pepper.  Using a spoon to break up ground beef until crumbly.  Cook for 15 minutes; stirring a few times.

Add wine; bring to a boil for 1 to 2 minutes.  Add tomato paste stirring so tomato paste covers everything.  Add the juice from the canned tomatoes, using your hands tear tomatoes up gently so they don't go squirting juice all over the place.  (I like to use my hands that way if I find tomato skin or a really thick piece of tomato I can throw it away).  Add beef stock, oregano, bay leaves and red pepper flakes; stir and set heat to low and cover for 2 hours; stirring occasionally.

Heat one cup of milk and add to meat sauce; salt and pepper to taste.  If the sauce is too thick for your liking add a 1/4  to 1 1/2 cups beef broth until you find the consistency that you like.  Simmer for another 2 hours.  Serve with tagliatelle or fettuccini top with fresh basil and finely grated parmesan cheese.

Shared with Jam Hands: Recipe Sharing Monday #77 and Weekend Potluck #100

Tuesday, October 22, 2013

Re-Sharing 2011 Post: Starbucks Gingerbread Bars

Now that we are on the other side of 100 days before Christmas the Holidays are going to sneak up on us and fast.  If you make baked goods for family, friends and neighbors this is a good time to try out new recipes.  The Holidays are stressful enough so try those new recipes early.  Your family will love it and when it comes time to make it to give as gifts you will know what to expect.

Starbucks Gingerbread Bars
adapted from Southern Living Christmas at Home, 2007


1 3/4 cup all-purpose flour
2 tsp ground cinnamon
2 tsp ground ginger
1/2 teaspoon baking soda
1/4 tsp salt
1 cup butter, softened
1/2 cups sugar
1/2 cup packed light brown sugar
1 large egg
1/3 cup molasses
3 Tbsp milk

Combine first 5 ingredients in a small bowl.  Beat butter at medium speed with an electric mixer until creamy.  Gradually add sugars beating until well blended.  Add flour mixture a little at a time mixing on low speed, just until blended.  Add molasses, egg and milk beating just until blended.  Spread evenly in a 13 x9 inch pan lined with foil.  Bake at 350 degrees for 25 minutes or until a toothpick comes out clean. Cool completely on a wire rack.

Orange Cream Cheese Frosting

1 8oz package Philadelphia Cream Cheese
3 Tbsp butter
Grated zest of one orange
1 tsp Grand Marnier
1 lb (box) powdered sugar
Candied Ginger

Beat cream cheese, butter, orange zest and Grand Marnier on medium speed until creamy.  Gradually add powdered sugar having the mixer on low then on medium beat until smooth.

Frost gingerbread and cut gingerbread into triangles placing a candied ginger on each triangle.  Store in refrigerator in a air tight container up to 7 days.  If they last that long.


Monday, October 21, 2013

Scrambled Eggs Florentine

One night every other week we have breakfast for dinner.  It is usually poached eggs, hash browns, bacon or sausage patties, with english muffins or toast.  I decided to go with scrambled eggs, we never have plain scrambled eggs.  I always add onions after than it's fair game with what's in the fridge.  I might add ham, cherry tomatoes, bell peppers or salami.  It's always a scrambled surprise. 

Normally I would add some hash browns or cottage potatoes and even some extra bacon as a side,  but we are going to DQ tonight for my annual Pumpkin Blizzard so I am keeping it light, so I can be bad, very bad.


Scrambled Eggs Florentine

3 slices bacon
1/2 onion, chopped
2 cloves garlic, minced
6 oz container fresh baby spinach
6 eggs
1/4 cup plus 2 tablespoons heavy cream
1/2 teaspoon salt
1/4 black pepper
couple pinches of red pepper flakes
1/2 cup asiago cheese, grated

Slice the bacon down the center lengthwise then chopped into small pieces.  Heat a large skillet over medium heat; cook bacon to desired doneness, remove bacon to a paper towel to drain.  Drain bacon fat leaving approx. 2 tablespoons in skillet.  Add onions cook until tender about 10 minutes, add garlic, stir onions and garlic together.  Add spinach cook with onions and garlic until wilted along with the cooked bacon pieces.  In a bowl add eggs, cream, salt, pepper and red pepper flakes; whisk together; add to spinach mixture and cook until the way you like your scrambled eggs cooked.  Sprinkle the top of the scramble with grated asiago cheese and serve.


Tuesday, October 15, 2013

Ginger Pumpkin Bread with Real Maple Icing

It is that time of month - Baking Partners monthly challenge.  This month I chose to go with the Ginger Pumpkin Bread with Real Maple Icing.  The other choice was a Yeast Pumpkin Bread.  

I loved the bread - delicious flavor next time I make it I will add some candied ginger to the batter I think those little bursts of ginger will taste fantastic.  I did add a Whiskey glaze to my bread just after it was taken out of the oven, this is optional. 


Ginger Pumpkin Bread with Real Maple Icing

12 tablespoons (1 1/2 sticks) unsalted butter, melted
2 1/2 cups flour, plus more for pan
2 teaspoons baking powder
2 teaspoons ground ginger
1 teaspoon salt
1 cup sugar
1 cup packed light brown sugar
1 15oz can pumpkin puree
3 eggs

Glaze

1/4 cup real maple syrup
1/4 teaspoon real vanilla
2 tablespoons unsalted butter
1/3 cup powdered sugar, more if needed
1 tablespoon heavy cream
a pinch of kosher salt

Preheat oven to 375 degrees, prepare a 8x5 loaf pan by buttering and dusting with flour; set aside. In a medium bowl, whisk together flour, baking powder, ginger and salt. In a large bowl, whisk together sugars, pumpkin, melted butter and eggs. Add in the flour mixture and stir until just combined. Pour batter into prepared pan bake for 60 to 70 minutes or until a toothpick comes out clean.  Let cool for 10 minutes, remove from pan and allow to cool completely on a wire rack.

For the Glaze: Heat a small skillet over medium high heat. Once the pan is hot, add in the two tablespoons of unsalted butter. The butter should instantly start to melt and turn golden. Once melted and deep golden, turn off the heat and add in the maple syrup and vanilla, whisking constantly (it should bubble up).  Once the bubbles have subsided a bit, whisk in the powdered sugar. Keep whisking while adding the tablespoon of heavy cream and pinch of salt.  Drizzle warm icing over cooled cake.

NOTE:  I did make a whiskey glaze to drizzle over the warm bread so it could soak in before it cooled. I took a 1/2 cup of water and a 1/2 cup of sugar and heated it a sauce pan over medium heat until the sugar dissolved.  Add a 1/4 cup of good whiskey and simmer for a few minutes.  Slowing pour over hot bread allowing it to absorb into the bread.


Wednesday, October 2, 2013

I will be back soon


I will be back to blogging soon 

Allergies have kicked me to the curb, stomped on me and left me for dead

and this is the nasty little booger that's doing all the damage


Rabbitbrush

What is rubber rabbitbrush?
Rubber rabbitbrush, or grey rabbitbrush, is a fast growing native shrub. While similar to sagebrush, it grows faster and competes less withforbs and grasses, thus filling an important part of the post-disturbanceplant community.
Rubber rabbitbrush flowers
True to its name, rubber rabbitbrush can be used to make rubber, but the process is not cost-effective. Compounds in rubber rabbitbrush are still being investigated for medicine and as an insect repellent. American Indians used it to make chewing gum, tea, cough syrup, and yellow dye. The rubbery twigs were used in making baskets.
What are its characteristics?
This shrub normally grows 1-7 feet tall and may have several stems from the base that branch to give plants a rounded appearance. Narrow, yellow-green leaves and flexible twigs are covered with felt-like hairs that reduce transpiration and water loss. Rubber rabbitbrush favors sunny, open sites, and is particularly common where recent disturbance has occurred. It is cold hardy, and tolerates moderately salty soils. In the Great Basin, rubber rabbitbrush grows from 3,000 to 8,000 feet elevation.
It reproduces from seeds and resprouts following fires. Clusters of small golden yellow flowers adorn the shrub canopy from mid-summer to early fall. In late fall, seeds are dispersed by wind, but they do not persist in the seedbank. Germination occurs easily, but seedlings often do not live unless late spring rains replenish soil moisture. Often, seedling establishment occurs near other shrubs where shading reduces moisture loss. This species rapidly colonizes disturbed sites, but stands decline over time.
What’s its value to the Great Basin? Rubber rabbitbrush plant
Wildlife only lightly forage on this species, but winter use can be heavy. It can be an important early winter food source for mule deer. Black-tailed jackrabbits eat the stems and leaves in the fall and winter. Rubber rabbitbrush provides good cover for many nesting birds. It is of little worth to livestock, though sheep use it some during the winter.
Rubber rabbitbrush is often considered less valuable than sagebrush.
What is its restoration potential?
The biggest benefit of rubber rabbitbrush is that it grows quickly, prevents soil erosion, and provides a shrub component until slower growing species out-compete it. Establishment is relatively easy, and seed dispersal is rapid. Where erosion potential is high, less palatable subspecies can be planted to deter herbivory.


Blogging tips